Tangled Up In Hue
This week on Maker Update: the simplest way to give your walls some color, a bomb-proof Raspberry Pi, the most over-engineered tally counter ever, and the fastest pen plotter in the west.
++Show Notes [Maker Update Ep.288]++
-=Project of the Week=-

Custom Nanoleaf Lights by Projects with Red
https://www.instructables.com/Custom-NanoLeaf-Lights-DIY-Wireless-Modular-Arduin/
-=More Projects=-

The Doodlestation by Love Hulten
https://www.youtube.com/watch?v=wC5qX3ECciY

Magic Wand Fiber Optic Dress by Kellechu
https://www.instructables.com/Color-Changing-Prom-Dress-With-Wand/

High-Speed 3D Printed Arduino Pen Plotter by IV Projects
https://www.youtube.com/watch?v=wX90X4rVUr8

Electromechanical Counter by Look Mum No Computer
https://www.youtube.com/watch?v=lKROdxOyX-Q
-=Tips & Tools=-

Smooth Arduino 16×2 Gauge by upir
https://www.youtube.com/watch?v=cx9CoGqpsfg
Two Factor USB Key by Josh
https://youtu.be/6b-HfaJbiQg

Magnetic Saw Guide by Kiwi Workshop
https://www.youtube.com/watch?v=BFCjpxclFBM

Industrial Raspberry Pis by Jeff Geerling
https://www.youtube.com/watch?v=9MqJI_F-sz8
-=Digi-Key Spotlight=-

How to Calibrate a Magnetomoeter by Shawn Hymel
https://www.youtube.com/watch?v=cGI8mrIanpk
-=Transcript=-
This week on Maker Update: The simplest way to give your walls some color, A bomb-proof raspberry pi, the most overengineered tally counter ever, saw guides, smooth gauges, and the fastest pen plotter in the west.
Hello and welcome back to Maker Update. I’m Tyler Winegarner and I hope you’re all staying cool and doing great. I’m pretty excited because I finally learned how to create chamfer toolpaths in Fusion 360. That doesn’t have anything to do with this week’s show, other than I’m excited about that too – let’s kick it off with the project of the week.
We could probably all use a little bit more color in our lives, and almost certainly on our walls. Thanks to the latest design by Projects in Red, that’s going to be pretty easy – even for folks who are really indecisive on their color scheme. What they’ve come up with is their own design for a Nanoleaf – a catchall term for geometric shapes that are illuminated by a diffused strip of RGB LEDs. They can interlock in a number of different patterns, and can be controlled remotely through your smartphone.
Their shape for the nanoleaf segment is an elongated hexagon – its actually pretty close to a single segment from a seven segment display. More on that later. It consists of two printable parts – the outer shell, the lid, and the diffuser made from frosted acrylic. Inside each one is a short strip of RGB LEDs, with a pair of male and female dupont connectors routed out the back to connect each segment electronically. There are ten connection points located around each segment, and they’re connected using this printable dovetail key.
The brains of the whole display is an ESP32 microcontroller, and you can manage it using the WLED app from any smartphone – and this was the real revelation for me. For years I’ve been programming RGB LEDs manually like a dummy. This just works with a simple bit of code that you upload to the microcontroller, and then everything else is part of the phone app – the number of LED segments, the color, brightness, patterns, its all here and it looks like it;s a blast to play with.
But because each segment of nanoleaf looks like its part of a 7-segment display, you can also use it as a clock, or a counter, or anything else displays numbers. There’s a bit more code involved for this, but they take the time to walk you through all of the steps. There’s a thorough video tutorial and an instructable full of written instructions and plenty of photos. If you’ve always wanted something like this for your streaming setup, or your home decor or zoom background, check out the link down in the description.
More Projects! You have to check out this gorgeous combination synthesizer, sequencer, echo looper and theremin by Love Hulten. He calls this the doodle station, and every part of this thing looks like a love letter to the entire history of electronic music. There’s a Moog synth – the echo loop is an actual tape loop you can see through a clear window, there’s a patch board, and the theremin arms look like a classic pair of television rabbit ear antennae.
The best part though might be the display: as you play various notes the character barfs out rainbows – and not just any rainbow, but one that shows the waveform of the note you’re playing. Like so many of Love’s other projects, this is a little light on details for you to build your own, but its worth checking out just to sit back and appreciate what’s possible.
Prom season may have already come and gone, but its worth seeing this color changing dress by kellechu. This dress is made of a fiber optic bodice with a white tulle skirt, and the entire thing is full of embedded RGB LEDs to add a colorful glow. Of course, no gown is complete without an accessory, and part of this design is a magic wand – the wand can scan the color of objects in the environment, and enable the dress to match it. That’s pretty cool. Also, this is kellechu’s first sewing project ever, so its a great testament to jumping in feet first and getting it done. There’s a full instructable for the project if you want to make your own, or just borrow notes for your own tech-inspired garment.
From IV Projects comes this high speed pen plotter. There’s a lot of DIY plotter projects out there but very few that can rip through a drawing like this one. To make the plotter as fast as possible, they’re minimizing hte amount of mass on the Y axis by just moving the paper, and using grit rollers to grip the paper. The whole thing runs off of a 24v power supply, which also allows it to run a cooling fan to control the temps of the stepper drivers running at maximum current. This thing is insanely cool – and there’s a full git repo of 3d printed design files if you want to make your own.
And finally, Sam from Look Mum No Computer has built an electromechanical counter to count up visitors to his museum. Of course, it couldn’t just be any old counter – its made up of an array of uniselectors, these wonderfully clicky solenoid-driven electronic components to represent each digit. Each of those drives its own nixie tube for the display. He maybe could have stopped there but… he really couldn’t could he? Nixie tubes are subject to burn-in, so there’s another uniselector to make sure each tube cycles through all of its digits every minute, and one more uniselector that helps generate a unique melody for every single person who comes through the door. If you love all things clicky and blinky, its hard to not love this project.
We’ve got a few tools and tips for you, first up is this smooth Arduino gauge on a 16×2 matrix display by Upir. 16×2 displays are generally pretty cheap for a large format display, but its hard to display a progress bar like this one. The real trick here is creating a custom character set so that you can have all the elements you need to create a smoothly filling progress bar. If you’ve ever wanted to extend the capabilities of one of these displays, check this one out.
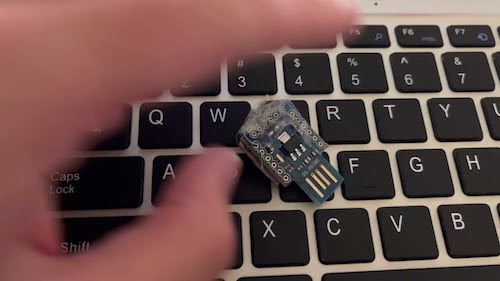
From Hackaday I learned about the GoodUSB project from [Josh]. This is a hardware key for two-factor authentication. You can just plug in this USB dongle instead of punching in a secondary number key. Depending on your situation this can be more secure than a one time code – and what’s best is that you can make your own for around $5. Commercial versions can go for 10 times as much. Josh provides a Git repo with all the code you’ll need to program it, as well as the companion app to be able to use it on any computer.
On youtube I saw this magnetic saw guide for japanese pull saws by Kiwi Workshop. This is a chunky, t-shaped jig with a handful of neodymium magnets along the face, perfect for setting up your saw for perfectly aligned cuts. The shape of it means that you should have an easy time bracing it for cuts in just about any orientation. He walks you through the whole process of making this out of wood but, I can imagine this could be a good candidate for 3d printing, too.
And finally, Jeff Geerling has a wonderful guide to Industrial Raspberry Pis. Industrial Pis come ina variety of shapes and sizes, but they all pretty much universally use the Raspberry Pi 4 Compute Module – this allows the manufacturer to route the ports so they can all be on one side of the enclosure, and the enclosures can also be easily mounted to a variety of industry standard infrastructures like rack mounts and DIN rails – even euroracks.
Jeff saves the best for last with the bomb-proof Raspberry Pi. Surprisingly, this isn’t to protect the Pi from hazardous environments, rather, its to prevent the pi from creating one. Sparks from static electricity can be very dangerous in combustible environments and this elaborate enclosure prevents that from happening. Its a cool look at some unique applications for the Raspberry Pi.
For this week’s Digikey Spotlight, Shawn Hymel has a helpful guide on how to calibrate a magnetometer. If you’ve ever compared a magnetometer out of the box against an analog compass or your phone’s digital compass, you probably found the indications didn’t quite line up. You’ll get to learn how these sensors work, the ways your environment can add distortions to the readings, as well as any interference contributed by nearby electronics. He then walks you through the code and software you can use to calibrate the electronic compass. If you’re looking to add one of these to an upcoming project, give this one a watch.
Alright and that is going to do it for this week’s show. I hope you all enjoyed it. If you did, be sure to subscribe, give us a thumbs up, leave us a comment – it’s always great to hear from you all. As always, huge thanks to everyone at Digikey Electronics for giving us the chance to share all this cool stuff with you – and thank you for watching. Take care, and we’ll see you soon.
RECENT POSTS
-
July 16, 2026
![Fool of a Took [Maker Update]](https://i0.wp.com/www.makerprojectlab.com/wp-content/uploads/2026/07/mu492-thumb_19201080.jpg?resize=150%2C150&ssl=1)
Fool of a Took [Maker Update]
This week on Maker Update: speak friend and enter,...
-
July 9, 2026
![Patterns in the Pixels [Maker Update]](https://i0.wp.com/www.makerprojectlab.com/wp-content/uploads/2026/07/mu491thumb_19201080.jpg?resize=150%2C150&ssl=1)
Patterns in the Pixels [Maker Update]
This week on Maker Update: an LED synthesizer, des...
-
July 2, 2026
![Portable Worlds [Maker Update]](https://i0.wp.com/www.makerprojectlab.com/wp-content/uploads/2026/07/mu490-thumb_19201080.jpg?resize=150%2C150&ssl=1)
Portable Worlds [Maker Update]
This week on Maker Update: a world in the palm of ...
-
June 25, 2026
![Checkmate, humans! [Maker Update]](https://i0.wp.com/www.makerprojectlab.com/wp-content/uploads/2026/06/mu489-thumb_19201080.jpg?resize=150%2C150&ssl=1)
Checkmate, humans! [Maker Update]
This week on Maker Update: pawn takes… a walk?, ...
-
June 19, 2026
![Random Fun [Maker Update]](https://i0.wp.com/www.makerprojectlab.com/wp-content/uploads/2026/06/mu488-thumb_1920x1080.jpg?resize=150%2C150&ssl=1)
Random Fun [Maker Update]
This week on Maker Update: games made just for you...
Submit a comment